
how to clean dusty pc without compressed air is mostly about control: moving dust out without blasting it deeper, while avoiding static, moisture, and bent fan blades.
If you’ve ever looked through a side panel and seen the gray fuzz on fan grills, heatsinks, and GPU shrouds, you already know the pain, louder fans, higher temps, and that uneasy feeling you’re shortening your hardware’s life. The good news is you can do a safe, thorough clean with basic tools, if you’re a little methodical.
I’ll walk you through what causes the worst dust buildup, a quick self-check to decide how deep to go, and a step-by-step process for cleaning fans, filters, CPU cooler fins, and the GPU without relying on canned air. I’ll also call out the mistakes that create new problems, like overspinning fans or dragging a vacuum nozzle across a motherboard.
Why dust builds up fast (and where it hurts most)
Dust isn’t just “dirty,” it’s an airflow problem. It mats up like felt, blocks fins, and makes fans work harder. That’s why a dusty system often gets louder before it gets unstable.
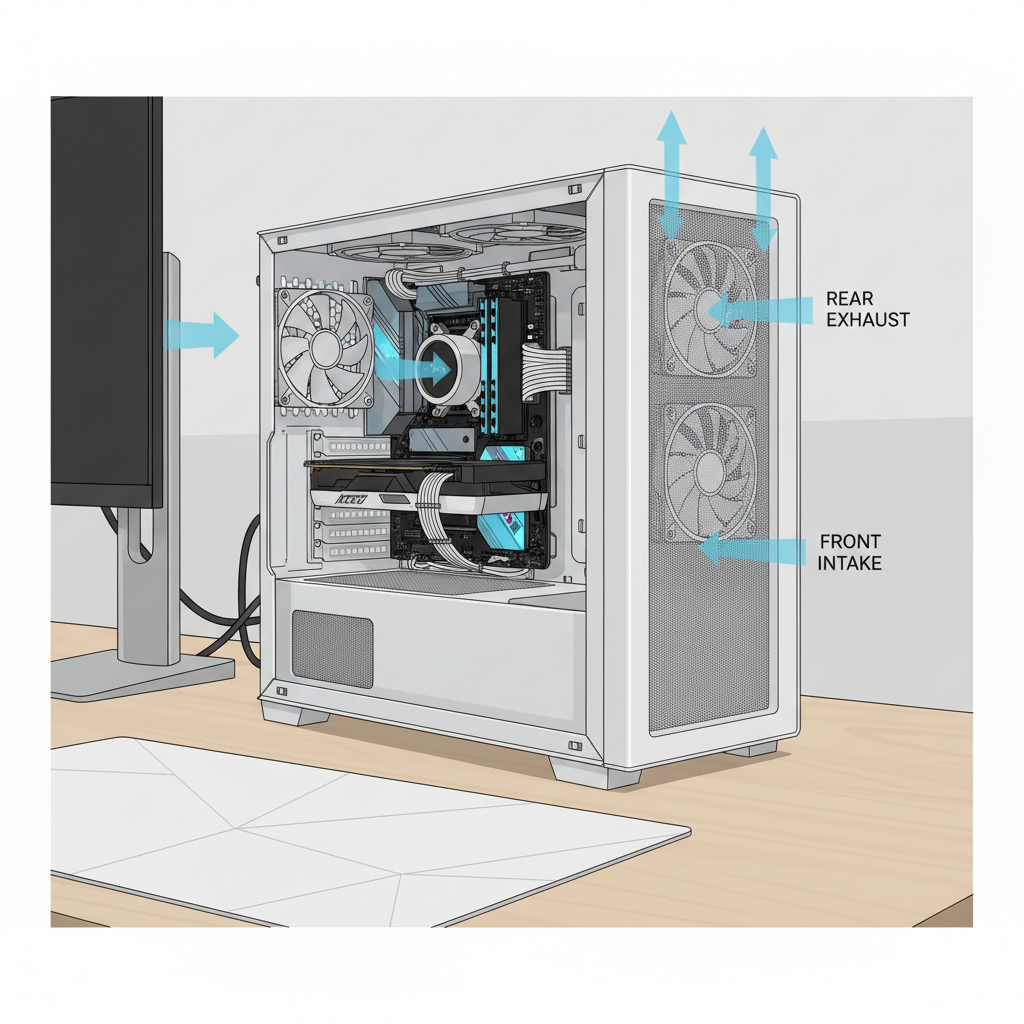
- Positive vs. negative pressure: With more exhaust than intake, cases tend to suck dust in through every crack, not just filters.
- Pets, carpets, and soft furniture: Fine fibers and dander cling to fan blades and heatsinks, forming thick layers.
- High-RPM small fans: They pull in more airborne particles and build rings of dust on blades and grills.
- Heatsink “radiators”: CPU tower coolers and AIO radiators trap dust in tight fins where it’s hardest to remove.
- GPU intakes: Many GPUs recycle warm air inside the case, so dust accumulation raises both GPU and case temps.
According to U.S. Environmental Protection Agency (EPA), indoor air can contain a mix of particles that affect air quality, which is part of why dust accumulates readily in enclosed indoor spaces like home offices.
Quick self-check: do you need a light clean or a deep clean?
Before you pull parts out, decide how far to go. A 10-minute clean is sometimes enough, and it lowers the chance you bump a cable loose or strip a screw.
- Light clean: Front filter looks gray, intake fan grills have a thin film, temps are “a bit worse,” no visible clumps in heatsink fins.
- Medium clean: Dust lines on fan blades, visible lint on GPU shroud, CPU cooler fins look partially blocked, fans ramp up often.
- Deep clean: Thick mats on filters, fuzzy heatsink fins, dust clumps near PSU shroud, temps jump quickly under load, system feels heat-soaked.
If you smell hot dust, see sticky grime (kitchen grease can do this), or notice random shutdowns, treat it as a deeper maintenance moment and work slowly.
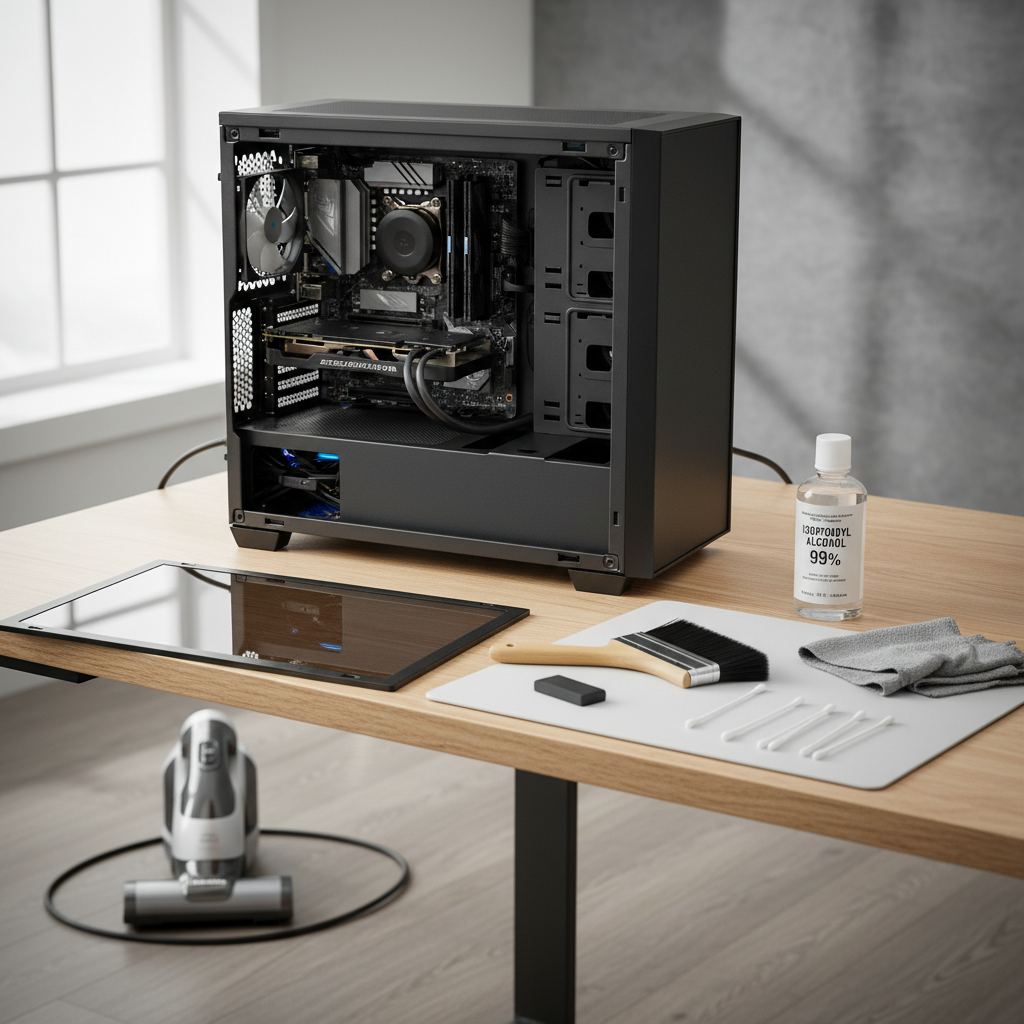
Tools that work without compressed air (and what to avoid)
You don’t need much, but the wrong tool can turn “cleaning” into “repairing.” Here’s a practical shortlist.
Recommended tools
- Soft anti-static brush (or a clean, soft paintbrush): loosens dust without scraping components.
- Microfiber cloth: wipes panels and flat surfaces without shedding fibers.
- Cotton swabs: detail work on fan hubs and corners.
- Isopropyl alcohol (70–99%): for sticky spots on plastic/metal surfaces; use sparingly, let it fully evaporate.
- Vacuum with brush attachment: used carefully, it can collect loosened dust (more on safe technique below).
- Flashlight: helps you see dust packed between fins.
Avoid (or use with extreme caution)
- Hair dryer/heat gun: can melt plastics, push dust deeper, and add static risk.
- Household wipes: many leave residue, and some contain additives that don’t belong near electronics.
- Vacuum nozzle on components: physical contact is the risk, not the suction itself.
Safety basics: static, fan overspin, and power handling
This is the part many people rush, then wonder why a fan starts clicking later. If you take nothing else away, take this: keep it gentle and controlled.
- Power down fully: shut down, switch the PSU off (0), unplug the power cable, then press the power button for a few seconds to discharge.
- Work on a hard surface: avoid carpet if possible, and keep pets away during cleaning.
- Ground yourself: touching the metal case frame frequently is a practical habit; a wrist strap can help if you have one.
- Hold fan blades still: when brushing or vacuuming near a fan, stop it from spinning freely to avoid overspin and stress on the bearings.
- No liquids near boards: if you use isopropyl alcohol, put it on the swab or cloth, not directly on parts, and allow full drying time.
According to OSHA, controlling static electricity is a recognized safety concern in workplaces; home PC work benefits from the same mindset even if you’re not in a formal ESD lab.
Step-by-step: how to clean a dusty PC without compressed air
This method is designed to remove dust from the case, filters, and heatsinks while keeping debris from flying everywhere. It also keeps your vacuum at a safe distance, acting more like a “collector” than a “scrubber.”

1) Open the case and remove filters
- Take off the side panel(s) and set screws in a small cup.
- Remove intake filters (front/top/bottom depending on your case).
- Brush filters gently into a trash can; if washable, rinse with water and let them dry completely before reinstalling.
2) Clean from “least sensitive” to “most sensitive”
- Start with case panels and empty floor areas.
- Move to fan grills and fan blades.
- Then tackle heatsinks and radiators, where dust actually impacts temps the most.
3) Use the brush + vacuum “catch” technique
- Hold the vacuum brush attachment a few inches away from the area you’re cleaning.
- Use your soft brush to loosen dust so the vacuum can capture it mid-air.
- Do not drag the vacuum head across the motherboard, GPU, or cables.
4) CPU cooler: focus on fin gaps
- Tower air cooler: brush along the fins (not across them) to avoid bending; use a flashlight to check the “back” side of the fin stack.
- AIO radiator: brush the radiator face lightly; stubborn lint often sits between the fan and radiator, so you may need to remove the fan for access.
5) GPU: clean the intake and surrounding area
- Brush dust from the GPU shroud vents and nearby case intake path.
- Hold GPU fans still and clean blades with a brush or barely dampened swab (isopropyl on the swab, not dripping).
- If the heatsink fins are packed and you’re comfortable, removing the GPU can make cleaning safer and more effective, but don’t force it if you’re unsure.
6) Finish with cable check and airflow sanity check
- Look for any cables nudged into fan paths.
- Re-seat filters, close the case, and confirm intakes aren’t blocked by a wall or thick carpet.
What to clean first: a practical priority table
If you’re short on time, this is where your effort pays off fastest.
| Area | Why it matters | Best no-air method | Risk level |
|---|---|---|---|
| Intake dust filters | Restores airflow immediately | Brush + rinse (dry fully) | Low |
| Front intake fans | Feeds clean air to CPU/GPU | Hold blades, brush, vacuum nearby | Low-Med |
| CPU heatsink/radiator fins | Direct impact on CPU temps | Brush along fins, flashlight check | Med |
| GPU fans and vents | Direct impact on GPU temps/noise | Hold blades, brush, detail swab | Med |
| PSU area | Dust can restrict intake | Clean external vent and filter only | Med-High |
Common mistakes that make things worse
Most “I cleaned it and now…” stories come from a handful of predictable missteps.
- Letting fans free-spin: brushing can turn a fan into a little generator; more commonly, overspin stresses bearings and leads to ticking later.
- Using a vacuum as a contact tool: suction is fine, impact is not, a bump can knock off a tiny component or snag a wire.
- Wet cleaning inside the case: even small moisture can creep under connectors; if you must spot-clean, use isopropyl sparingly and wait.
- Skipping filters after cleaning: running “open intake” may look cooler at first, but it often increases dust intake fast.
- Ignoring the room: if your PC sits on carpet near a vent or pet bed, dust returns quickly, no matter how perfect the clean.
Key takeaway: If you’re wondering how to clean dusty pc without compressed air and still be safe, your “gentle brush + controlled suction” approach beats aggressive blasting or rubbing almost every time.
When you should consider professional help (or at least a deeper inspection)
Most PCs are straightforward, but a few situations deserve extra caution.
- Visible corrosion, sticky residue, or signs of liquid exposure: cleaning might not be enough, and powering on could be risky.
- Grinding or wobbling fans: dust removal won’t fix a failing bearing; replacing the fan is often the real solution.
- Thermal issues persist after cleaning: you may be dealing with dried thermal paste, an improperly seated cooler, or an airflow design issue.
- You need to disassemble a GPU: removing a shroud or heatsink can void warranties and requires careful reassembly, when in doubt, a repair shop is safer.
If you’re cleaning a work machine or anything with critical data, it’s also smart to back up first. Dust cleaning is low-risk, but accidents happen.
Conclusion: keep it simple, repeatable, and gentle
The most reliable way to handle how to clean dusty pc without compressed air is to treat dust like debris you want to lift and collect, not “blast away.” A soft brush, a careful vacuum-at-a-distance, and clean filters get you most of the benefits without drama.
If you want an easy next step, set a reminder to check filters every 3–6 weeks, then do a deeper internal clean a few times a year, more often if you have pets or your PC sits near the floor.
FAQ
Can I use a regular household vacuum to clean inside my PC?
You can, but use it as a collector, not a contact tool. Keep the nozzle and brush attachment a few inches away, and do the actual loosening with a soft brush while holding fans still.
How do I clean dust out of a CPU heatsink without compressed air?
Use a soft brush along the fin direction and a flashlight to check the back side. If dust is packed, removing the fan from the heatsink often improves access without needing to remove the whole cooler.
Is it safe to wipe fan blades with alcohol?
Usually yes if you use a small amount of isopropyl alcohol on a swab or microfiber cloth and keep it away from the fan motor and electronics. Let everything dry fully before powering on.
What’s the safest way to clean GPU fans without canned air?
Hold the fan blade in place, brush off dust gently, then detail-clean with a dry swab. If buildup is heavy in the heatsink fins, you may get better results by removing the GPU for access, but don’t disassemble the cooler unless you’re confident.
How often should I clean a dusty PC?
It depends on pets, flooring, and filter quality. Many home setups do fine with filter checks monthly and internal cleaning every 3–6 months, but high-dust rooms may need more frequent touch-ups.
Why are my temps still high after I cleaned the dust?
Dust is only one variable. Fan curves, old thermal paste, poorly seated coolers, or blocked intakes can all keep temps elevated. If the PC is older, a careful inspection (or a technician) may be worthwhile.
What should I do if I accidentally spun a fan while cleaning?
One quick spin usually won’t destroy anything, but repeated overspin can stress bearings. If you hear new ticking or rattling afterward, watch it for a few days, and consider replacing that fan if the noise persists.
If you’re trying to keep a gaming PC or home office desktop running cooler without buying extras, a simple brush-and-catch routine plus regular filter maintenance is often the most practical “set it and forget it” approach, and if you’d rather not open the case at all, it might be worth looking into cases with easier-to-access filters and better airflow layouts.