
OpenClaw is built for teams who need reliable, precise grasping without turning every pick-and-place task into a custom mechanical project.
If you have ever watched a robot “almost” get it right, you know the pain: too much squeeze damages parts, too little drops them, and inconsistent friction makes your cycle time drift. The gripper ends up dictating what automation is possible, not the other way around.
This guide breaks down what matters in practice: OpenClaw features that affect accuracy, how the OpenClaw API typically fits into real stacks, what to ask about OpenClaw pricing, and where OpenClaw alternatives may be a better fit. I’ll also call out integration gotchas and security questions that teams often leave until late.

What makes OpenClaw different in day-to-day use
Most “smart gripper” claims sound similar until you put one on a line and try to hit uptime targets. The practical differentiators usually show up in control resolution, feedback signals, and how quickly you can recover from edge cases.
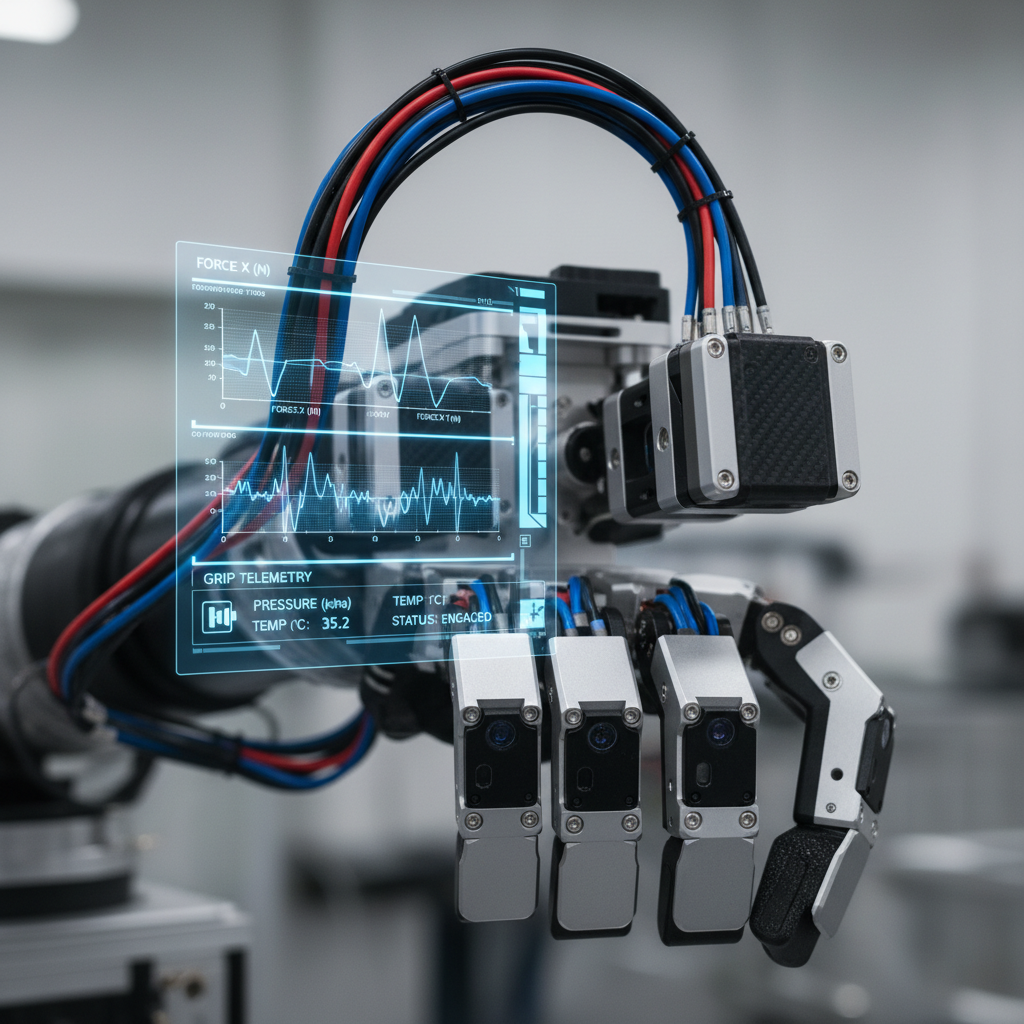
- Closed-loop control: Instead of commanding a position and hoping, you typically tune grip based on force or torque feedback, which helps when part-to-part variation exists.
- Repeatability over raw strength: Many applications care more about consistent, gentle handling than maximum gripping force.
- Better observability: Telemetry that your PLC or robot program can actually use tends to reduce “mystery downtime.”
- Software-first configuration: When profiles and limits are configurable in software, changeovers become less painful.
According to NIST (National Institute of Standards and Technology), interoperability and repeatable performance are central themes in modern manufacturing automation, and grippers are one of the most common friction points when systems scale. The closer your gripper is to plug-and-play observability, the faster you can iterate.
OpenClaw features that matter for precision (and which ones are “nice-to-have”)
When people compare grippers, feature lists get long fast. Here’s the set that usually moves the needle for precision handling, especially for electronics, medical device assembly, light packaging, or lab automation.
Core features to prioritize
- Force sensing and limits: A hard cap prevents crushed parts when a fixture shifts or a part is out of tolerance.
- Slip detection or grip validation: Even simple “did we actually grasp?” signals reduce downstream defects.
- Configurable grip profiles: Different SKUs often need different ramp rates and holding force.
- Calibration workflow: If calibration is tedious, teams stop doing it, and precision quietly degrades.
Helpful, but situational
- On-gripper compute: Great for advanced control, but can complicate validation and updates in regulated environments.
- Vision add-ons: Useful when parts are unfixtured, but sometimes a simple mechanical guide beats more software.
- Quick-change tooling: Excellent for high-mix lines, less critical for dedicated cells.
Key takeaway: If you can only validate a few items in a demo, validate grip consistency across slightly different parts, not the best-case “perfect part on a perfect day.”
OpenClaw API and integration: what teams usually underestimate
OpenClaw integration often looks straightforward in a diagram, then reality shows up: network policies, PLC timing, robot controller limitations, and who owns retries when a grip fails.
Common integration patterns
- Robot controller → gripper: The robot program sends open/close commands and reads status bits.
- PLC orchestration: A PLC sequences the cell and treats the gripper as an IO device with richer telemetry.
- Edge PC middleware: A small service talks to the OpenClaw API, logs telemetry, and exposes simplified signals to legacy control.
Questions worth asking before you commit
- What are the supported protocols (EtherNet/IP, PROFINET, Modbus TCP, REST, ROS, etc.) in your target setup?
- How do you handle timeouts and retries so you don’t double-close on a part?
- Can you read force/position at the rate your control loop needs, or do you only get slow status updates?
- What does the vendor consider “supported” vs “possible” with custom work?
Also, don’t treat OpenClaw documentation as a checkbox. Good docs reduce commissioning time, but they also reveal whether error codes, state machines, and recovery behavior are clearly defined.
OpenClaw pricing: how it’s usually structured (and how to compare fairly)
OpenClaw pricing can vary by configuration, volume, support level, and whether you need add-ons like extended warranties or specialized fingertips. Many teams get tripped up by comparing “unit price” while ignoring the integration and lifecycle costs.
Here’s a practical comparison table you can reuse for internal alignment. Treat it as a checklist, not a quote.
| Cost area | What to clarify | Why it matters |
|---|---|---|
| Hardware base | Gripper model, payload, stroke, mounting | Overbuying capacity can add cost without improving yield |
| Control/licensing | Is the API/SDK included? Any per-robot fees? | Software costs can surprise at scale |
| Integration | Adapters, cables, fieldbus modules, commissioning time | Often exceeds the delta between two grippers |
| Consumables | Finger pads, seals, wear parts | Changes your long-term operating cost |
| Support | SLA, on-site help, firmware updates | Downtime cost usually dwarfs hardware cost |
Reality check: A slightly higher upfront cost can still be the cheaper option if it reduces tuning time and failures, but only if your team can quantify those hours.
Quick self-check: are you a good fit for OpenClaw?
This is the part most people skip, then wonder why performance feels “fine but not great.” If you answer “yes” to several items below, OpenClaw is more likely to pay off.
- You handle fragile or cosmetic parts where marks and micro-cracks matter.
- Parts vary slightly, and fixed-position gripping causes intermittent drops.
- You need traceability or at least grip telemetry for debugging.
- Changeovers happen weekly or monthly, not once a year.
- You already plan to invest in software integration, not only mechanical fixturing.
If your process is extremely dusty, wet, or washdown-heavy, you’ll want to confirm environmental ratings and sealing approach early. Many “smart” grippers work great in clean automation, but need extra diligence in harsh environments.

A practical OpenClaw tutorial: commissioning in sane steps
This OpenClaw tutorial style flow is how teams usually keep risk low: validate mechanics, then signals, then tuning, then failure recovery. It’s not glamorous, but it prevents the “works in demo, fails on line” trap.
Step 1: Mechanical setup that doesn’t sabotage you
- Confirm mounting rigidity and alignment, small flex can look like control instability.
- Pick fingertip materials that match your part surface, friction is a feature, not an afterthought.
- Define a safe “open” pose that avoids collisions with fixtures.
Step 2: Bring up signals and states
- Verify command path, status bits, and any analog/telemetry reads.
- Map error states into your cell logic, especially “object detected,” “overforce,” and “motion incomplete.”
Step 3: Tune grip profiles on purpose
- Create at least two profiles: “approach/grasp” and “hold/transport.”
- Ramp force gradually on fragile parts, and validate that cycle time still meets your target.
- Test with worst-case parts: low friction, slight dimensional drift, and temperature variation if relevant.
Step 4: Design recovery like you expect failure
- If grip validation fails, decide whether to re-grasp, reject, or pause for an operator.
- Log the last known force/position values, that data is often the fastest root-cause path.
Key point: Integration success is usually less about perfect control and more about predictable behavior when something goes wrong.
OpenClaw security, reviews, and alternatives: how to evaluate without hype
Security and vendor quality are rarely exciting, but they affect whether your deployment survives an audit, an IT policy change, or a rushed firmware update.
OpenClaw security questions to ask
- Do you get signed firmware, and is there a clear update process?
- How are API credentials stored and rotated, and can you disable unused services?
- Can it run on an isolated network segment with restricted inbound access?
According to CISA (Cybersecurity and Infrastructure Security Agency), reducing attack surface and controlling access to industrial devices are common best practices. If your environment is regulated, you may want your security team involved before you deploy.
Reading OpenClaw reviews the right way
- Look for context: payload, part material, and duty cycle matter more than star ratings.
- Separate “easy to integrate” from “easy to tune”: those are different pains.
- Pay attention to support: response time and clarity often decide outcomes during commissioning.
When OpenClaw alternatives may be better
- You need extremely high gripping force with minimal electronics.
- Your cell is harsh enough that simpler pneumatic tooling is more reliable.
- Your budget model favors low-capex tooling even if tuning time increases.
OpenClaw use cases tend to shine when precision and feedback reduce scrap, rework, or operator interventions. If your task is more “grab a box” than “handle a delicate part,” you might not need this level of sophistication.
Conclusion: picking the next step that actually de-risks your project
OpenClaw is most compelling when your bottleneck is consistency, not raw gripping strength, and when your team benefits from real telemetry instead of guessing why failures happen.
- If you’re early: write down three failure modes you must prevent, then validate OpenClaw against those in a demo.
- If you’re mid-project: prioritize error handling and logs, that work often pays back faster than more tuning.
If you want a lower-friction path, gather your robot/PLC model, target protocol, part list, and cycle-time goal, then use that to structure an integration conversation. The best vendors respond well to specifics, and the weak ones usually get vague.